
InDesign
AUTO-SIZING TEXT FRAMES IN INDESIGN
Today we’re going to look at a two methods in InDesign to automatically resize text frames to match the text within.
When laying out text it’s often useful to employ panels of colour and/or tints to help separate text from other page content or break-up information into logical sections. Since InDesign allows Fill and Stroke attributes to be assigned to Text Frames as well as the text itself this is easy to do.

Obviously we could just use two frames, one for text and one for the background, and in some cases this is an easier way to go as the two elements can be moved and sized independently, but the advantage of using a combined approach is uniformity. If I need to have several panels formatted the same way throughout a document and want consistent spacing on each one I can use the ‘Inset Spacing’ settings – go to Object>Text Frame Options… or Cmd/Ctrl+B

In the example below I’ve added 2mm spacing on all sides so the text sits inset from the frame edge – you’ll also see an additional guide line within the bounding box of the text frame indicating the inset.

So far, so good. However it’s still possible to change the size of the frame such that the bottom spacing is no longer constant or collapses into the text causing overset.

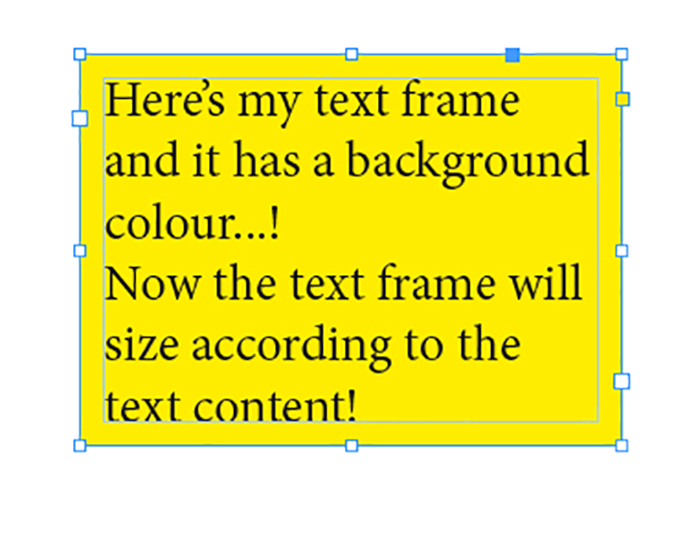
Bundled together in the same Text Frame Options dialogue we also have some auto-sizing control. Click on the Auto-size tab at the top of the panel. Use the Auto-sizing dropdown to control whether sizing is applied to height and/or width or chose to keep them proportional. Beneath that we can specify where the resize occurs – top down, from the middle out, up and right etc. and specify minimum dimensions if relevant.
In this example I want the frame to keep it’s current width so I’ll choose “Height Only” and set the resize to occur from the top down so the top of the text frame keeps the same vertical position.

As we can see, I can add more text content and the text frame will resize accordingly.
Below is a real-world example of how you might use this within a layout. For a recent project I had to list contact information for exhibitors at a trade fair which included a company bio of around 100 words – typically none of the companies stuck to the 100 word count so the bio section varied in length for each entry.
By specify the inset spacing and auto-sizing for the bottom text frame the bio text could be pasted in and the resizing and spacing was automatically taken care of. Considering there were over 100 exhibitors this saved a decent chunk of time and kept the formatting constant throughout.

The only limitation with Auto-sizing is that it applies to one text frame at a time. With this particular layout the top two text panels stayed a constant size and only the bottom one varied so using Auto-sizing provided an ideal solution. But what if we have a scenario where any or all of the panels might vary in content. If the middle panel Auto-sizes the bottom panel will not move with it as there is no way to link the panels together so they behave as a unit.
One solution would be to format the text as a table. We tend to think of tables as multiple rows or columns but they work just as well in single file and since each cell is linked to the next one any resizing will cause neighbouring cells to move across/down as needed.
Below I’ve formatted the same exhibitor information but this time used a table so each ‘text frame’ is a now a cell within the table so cell options are used for spacing, colour etc. Any of the panels can vary in height so if I add copy to the middle panel everything below shifts down as each line of text is introduced keeping all the formatting and spacing consistent.

By using the Cell Inset options we can achieve the same inset spacing as before. These can be accessed from the control panel (as below) when a cell is active, or by choosing Cell Options from the Table menu.

So now you have two methods for auto-sizing text frames and keeping formatting and spacing consistent throughout.