
Uncategorised, InDesign
Accessible PDF Reading Order: How Acrobat Pro and InDesign Ensure the Right Sequence
What Is PDF “Reading Order” and Why It Matters
In PDF accessibility, reading order refers to the logical sequence in which a document’s content is presented to users of assistive technologies (like screen readers). Unlike a printed page (where sighted readers infer order from layout), a PDF must explicitly define the order of text, images, and interactive elements so they make sense when read aloud or navigated by keyboard. This logical order is established through the PDF’s tag structure – essentially an outline of the content. In a properly tagged PDF, elements are sequenced in a meaningful hierarchy (headings, paragraphs, lists, etc.), ensuring the content is understandable in the intended order. If the reading order is incorrect or chaotic, it can confuse or mislead non-visual readers. For example, a multi-column layout that isn’t tagged correctly might be read straight across the page (mixing columns) instead of down the first column then the next, making the content incoherent to a listener. In short, maintaining a meaningful sequence is critical – it allows assistive technology to present the document in a way that preserves its meaning and flow.
Establishing the correct reading order is not just a best practice; it’s required for PDF accessibility compliance. Standards like WCAG (Web Content Accessibility Guidelines) and PDF/UA (ISO 14289) emphasize logical reading sequence as a fundamental requirement. PDF/UA, the official ISO standard for accessible PDFs, explicitly requires that a PDF’s tag hierarchy reflect the document’s intended logical order. In other words, the PDF’s underlying tags must be arranged in the same reading sequence that a sighted person would naturally follow. The tagged PDF feature of PDF technology was designed for this purpose – it allows authors to specify both the structure and the sequence of content (e.g. identifying headings versus paragraphs, and their order) so that screen readers know what to read next. When a PDF is properly tagged and ordered, someone using a screen reader or other assistive tool will hear the content in a sensible order that matches the document’s intended meaning and layout. On the other hand, if tags are missing or ordered poorly, the output can be a jumbled mess. This is why designers creating accessible PDFs must pay careful attention to reading order from the start.
Checking Reading Order in Acrobat Pro: Key Panels and Tools
Once a PDF is exported (for instance, from InDesign), Acrobat Pro provides tools to check and fix the reading order as part of an accessibility review. The primary tool for this in Acrobat is the Accessibility Tags panel often just referred to as the Tags panel:
-
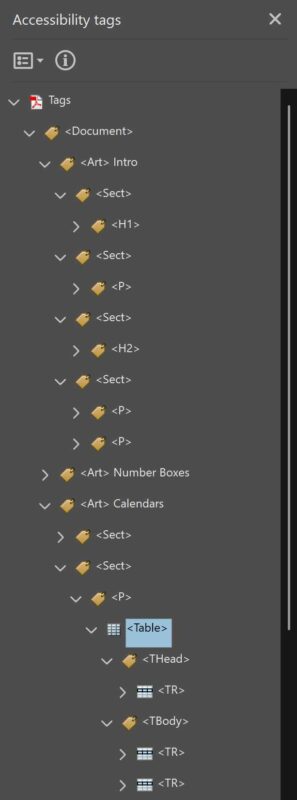
Accessibility Tags Panel: This panel (accessible via View > Show / Hide > Navigation Panes > Accessibility Tags) displays the PDF’s tag tree – essentially a nested list of all content tags in the order they will be read. Think of it as the document’s structured outline. You can expand the tag tree to see the sequence of headings, paragraphs, figures, lists, etc. If something is out of order, you can rearrange it here by dragging tags into the correct sequence. For example, if a heading level is misplaced in the order, you can simply drag that
<H1>or<H2>tag to the right spot in the tag tree. Rearranging tags in this panel changes the logical reading order that assistive technologies will follow. The Tags panel is considered the source of truth for reading sequence in a tagged PDF – in fact, making sure the Tags panel reflects a logical flow is a core part of PDF/UA compliance. Use this panel to verify that the structure makes sense (e.g., the title is the first tag, sections follow in order, etc.). Whilst you can control the tag order in this panel, I wouldn’t recommend doing so in many cases. Instead I would advise users to go back to their editing software (Adobe InDesign is particularly good at creating fully accessible PDFs) and adjust the order there then re-export the document. This approach ensure the changes are also present in future updates to the document
-
Order Panel / Reading Order Tool: One source of confusion I often find is users relying on the Order panel or Acrobat’s Reading Order tool, believing it to be a reliable source of information for the read order. Its understandable, I mean it’s called the reading order tool, and it puts little numbers on every box on the page. Unfortunately this is misleading, as this is showing the visual rendering order of the content on the page which typically relates to the order in which content was added to the page during the documents creation. It is not referring to the order in which accessible devices like screen readers will read the document, and such devices will rely on the order of the tags in the tags panel. The order panel and the reading order tool are best thought of as legacy utilities for fixing untagged or broken PDFs, and are not relevant if you are working with properly tagged documents created in tools like InDesign.
It is also worth noting that Acrobat’s Read Aloud tool now follows the order found in the tags panel which is inline with modern accessibility standards and as such can be used to confirm if the content is being read in the right order. If you find certain decorative elements being read out when they shouldn’t, you will need to tag them as artifacts back over in InDesign and reexport the document, so that they’re removed from the reading order. The goal is that all essential text is read in a sensible flow, and things like headers/footers, decorative lines, or background images are skipped over by assistive tech.
InDesign Techniques for Automating Proper Reading Order (Overview)
Designers using Adobe InDesign have a head start when it comes to establishing a correct reading order before the PDF ever gets to Acrobat. InDesign is capable of exporting tagged PDFs with a defined structure and reading sequence, but you need to make use of its accessibility features during document setup. Here is a broad overview of key InDesign features and options that help automate reading order and tagging for accessibility:
-
Articles Panel: InDesign’s Articles panel (Window > Articles) is the definitive tool for setting the reading order of content. Think of it as a way to gather all the text frames and graphics in the order that they should be read. By dragging and dropping frames into the Articles panel (and arranging them in the correct sequence), you are telling InDesign how to order those elements in the exported PDF’s tag structure. For instance, you might add your title, then subtitle, then body text frames, then images, etc., ensuring the sequence in the panel matches the logical flow of the document. When you export to PDF with Create Tagged PDF enabled, InDesign will use this order for the tags. Important: In the Articles panel’s options menu, make sure “Use for Reading Order in Tagged PDF” is checked as this ensures the panel’s order is used in the PDF export. Using the Articles panel is especially crucial for designs with complex layouts, multiple columns, or separate text boxes, as it guarantees the PDF’s reading order isn’t left to chance. It’s worth noting that with the Articles panel your content is either in it or it isn’t. If it isn’t, it doesn’t exist in the read order as far as screen readers are concerned.
It’s worth noting that this doesn’t remove the need to undertake other best practice accessibility preparation, for example artifacting decorative images, as whilst such images would be ignored for the primary read order, they could still be encountered if users undertook actions outside of this, such as reading descriptions of all images out. -
Paragraph Styles Mapped to PDF Tags: Most InDesign users already leverage paragraph styles for consistent formatting. These styles can also be mapped to specific PDF tags to provide semantic structure automatically. In the Paragraph Style Options dialog (under the Export Tagging section), you can assign each style a PDF tag (e.g., map your “Title” style to <H1>, “Subhead” to <H2>, body text to <P>, etc.). This way, when exporting to PDF, InDesign knows to tag those elements as headings of the appropriate level or as paragraphs in the PDF’s structure. If you don’t do this, InDesign will by default tag most text as a generic paragraph <P> meaning your carefully styled headings might not be identified as headings for screen reader users. By mapping styles to tags, you automate the process of creating a structured, navigable PDF outline (and you won’t have to manually retag things in Acrobat). It’s a simple step that vastly improves the accessibility of the output: for example, an <H1> tag tells assistive tech “this is a top-level heading,” allowing users to navigate by headings, whereas a plain <P> tag would not. In short, style-to-tag mapping preserves the document’s hierarchy in the PDF and ensures the reading order has proper landmarks (like headings) for navigation.
-
Threaded Text Frames and Anchored Objects: InDesign documents often use multiple text frames, which can complicate reading order if you are not using the Articles panel (you don’t have to use the articles panel and on many documents don’t need to). Best practice is to thread text frames for continuous stories whenever possible (so that body text flows from one frame to the next in sequence). Threaded frames will export as one continuous content flow in the PDF tag structure. If you have an image or a sidebar that should be read at a certain point in the text, consider using anchored objects, that way, the image’s tag (Figure tag) will appear in the correct place in the reading order, instead of floating to the end of the tags or somewhere unpredictable. Essentially, anchoring an object means it travels with the text in a logical way. For designers, anchoring might sound like it will mess up your layout, but InDesign allows anchoring invisibly (the image can remain visually where you want it, but logically it’s linked at a point in the text). By anchoring graphics and other non-text elements to the related text content, you ensure the screen reader will announce those figures or sidebars at the right moment, instead of, say, reading all images at the end. This technique reduces the need for reordering later and preserves context for non-text elements.
-
Automatic Tagging of Non-Text Elements (Alt Text and Artifacts): InDesign also provides tools to add accessibility metadata to non-text content, which indirectly affects the reading experience. Using Object Export Options, you can add alternative text to images or mark an object as an artifact. Alternate text (alt text) is a description read aloud in place of an image, and you can input this in InDesign so it gets exported into the PDF’s tags (as an Alt description on the <Figure> tag). Similarly, purely decorative items or redundant text frames (like decorative lines, background shapes, or repeated logos) can be marked as artifacts. This is important for reading order because any content marked as artifact will be skipped by screen readers (it won’t interrupt or clutter the reading sequence). By pre-defining artifact elements in InDesign, you ensure that when the PDF is read aloud, the user isn’t bombarded with irrelevant bits (like “Graphic: decorative border…” etc.). Essentially, use InDesign’s tools to label what each object is (heading, paragraph, figure, artifact) so that the exported PDF is as accessible as possible from the get-go. It’s also worth noting that InDesign gives you the option to now only create custom Alt text for your graphics but you can also import Alt text from the image metadata which can save a lot of time.
-
Export Settings for Accessibility: When exporting from InDesign, always enable the options that preserve the structure. In the PDF Export dialog, make sure “Create Tagged PDF” is checked, as well as checking “Use Structure for Tab Order.” These settings ensure that the structure and reading order you established (via the Articles panel, threading, etc.) are embedded in the PDF. The result is a PDF where the reading order is correct, and form fields or links (if any) will be tabbed according to the document structure. It’s far easier to get these right at export time than to fix an untagged or mis-ordered PDF after the fact.
By taking advantage of these InDesign features, designers can automate the accessibility work and produce a PDF that is compliant, passes accessibility checks and ensures a good experience for users of assistive technology. The process essentially mirrors what you used to do manually in Acrobat, but is far quicker and easier. The end result showcases professionalism and accessibility expertise – you’re delivering PDFs that not only look good but also read right for everyone and are legally compliant under the relevant legislation. And while we haven’t dived into every possible trick or scenario, the above practices cover the broad strokes that every InDesign user should know when asked to create accessible PDFs. There are of course a variety of additional tips, tricks and techniques which help ensure your documents are fully accessible and these are covered in more detail in both my live pdf accessibility courses and the pre-recorded pdf accessibility video course.
Conclusion
For InDesign users new to PDF accessibility, understanding reading order is a key step toward producing inclusive documents. Remember that a PDF’s reading order is all about structure and sequence: by planning those in InDesign and verifying them in Acrobat, you can confidently output PDFs that comply with accessibility standards and provide a smooth experience for screen reader users. Always start with a well-structured source document (use those styles and articles!), then use Acrobat Pro’s Tags panels to check that everything came through correctly. With a bit of practice, ensuring the correct reading order will become a natural part of your design workflow – and your organization’s PDFs will be all the better for it, whether they’re destined for a public-sector website or a corporate report. By integrating these practices, designers demonstrate not only compliance but also a commitment to effective communication for all readers, which is the ultimate goal of accessible design.
Useful Resources
-
Highlander Training’s video course on Creating Accessible PDFs in InDesign
-
Highlander Training’s live online course on Creating Accessible PDFs in InDesign
-
W3C Web Accessibility Initiative – PDF Technique PDF3: Ensuring Correct Tab and Reading Order
-
PDF/UA (ISO 14289) via PDF Association – Overview of Tagged PDF and Reading Order