Uncategorised
Creating Multi-Level Lists in Adobe InDesign
Multi-level lists can be a useful tool in InDesign for organizing content in your document in a hierarchical way. To illustrate this, let’s create a list of fruits with various varieties. We’ll start with a first-level list (numbered) for the fruits, and then in Step 2 add in a second-level list (lettered) for the different varieties.
Step 1: Creating a Numbered List
Let’s begin with our first-level list. We are listing “apples,” “oranges,” and “lemons.”
- First, launch Adobe InDesign and open your document. If you don’t have one yet, create a new one by navigating to File > New > Document.
- Select the Type Tool from the toolbar (or press T on your keyboard) and either click and drag on the page to create a new text frame or click into an existing text frame where you would like to insert your list.
- Type in your first-level list items: “apples,” “oranges,” and “lemons,” each on a new paragraph. Make sure you use a paragraph return (Enter) and not simply a line break (Shift + Enter) between each item.
- Now, to convert this into a numbered list, select the lines of text then navigate to the control panel at the top of your screen, and click the Bullets and Numbering option (marked A in Figure 1). You might need to switch from character to paragraph formatting using the icon (marked B in Figure 1). Your first-level list is now created. By default, it uses the 1, 2, 3 numeric style.

Figure 1.1
Step 2: Creating a Lettered Sub-List
Next, we’re going to create a sub-list under “apples” to list different varieties as “red,” “green,” and “yellow” using the lettered style (a, b, c).
- Press Enter after “apples” and type “red,” “green,” and “yellow,” each on a new line.
- Highlight these three lines, and follow the steps to turn it into a list (just like you did before).
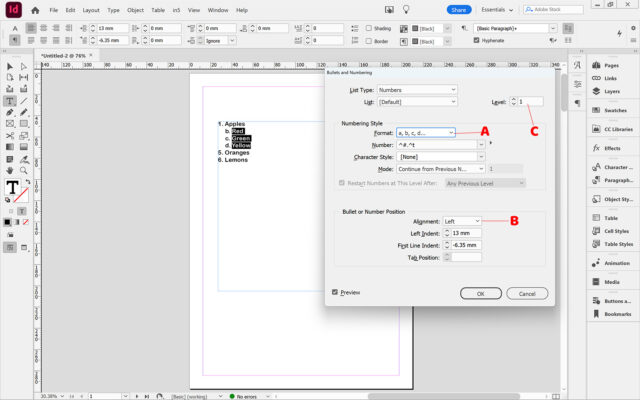
- This time, however, we’ll change the format to alphabetical. To do this, hold down the Alt / Option key and click on the Lists icon (marked A in Figure 1.1) to bring up the Bullets and Numbering dialog box. In here change the Format option to lowercase alphabet by selecting this from the drop down (marked A in Figure 1.2).
- I am also going to increase the indent for this second level list by adjusting the setting for left indent (marked B in Figure 1.2) .
- Finally I also need to ensure the rest of the list numbering continues in the right order, and to do this will set the level to 2 (marked C in Figure 1.2).

Figure 1.2
Now, you should have a primary list of fruits, and a secondary list under “apples” showing their different varieties.